


This is day 2 of my current project, and convincing Will that it would actually be successful in the end took a whole lot of smooth talking.
The idea came to me during the holidays last year. I wanted the hutch in my kitchen to be moved because it made for a slightly cramped feeling in our eat-in-kitchen, but there isn't another spot that we could have put it in our home.
So my crazy idea was born out of my desire for change, and Will's absolute refusal to not have to store any furniture out in his shop.
Thanks to my ability to think outside of the box, I got two new pieces of furniture from two old pieces of furniture.
The base of our hutch is now sitting in our family room right next to our kitchen, acting as a buffet and I love it! Can't wait to get some fresh paint on it!
The top of my hutch is now in...
Ellison's room.
Really!
And it looks like this...

Stay with me on this one. I know it doesn't look great right now, but hang on...
Ellison's dresser is the kind that acted as our changing table when she was a baby, but those days are now long gone. That extra drawer on top caused a bit of trouble in making this idea work, but we came up with a solution to keep the top of the hutch supported so that it could sit on top of her dresser. Will built an "L" shaped support to fit directly under the hutch so that once painted, it would visually be a smooth transition from one piece of furniture to the next.
The doors on top used to have glass in them, but we replaced that with left over beaded board that came from a previous project. I am storing all of the kids' bed linens up there, so having closed off doors is a must...


I love my hutch and getting rid of it is something that I'm not ready to do. Not only is it a great, solid piece of furniture, but it was one of the first pieces that Will and I bought after we got married. It has sentimental value to me. Luckily, I still think it's just as pretty as it was the day we bought it. But it has moved from house to house, through four different moves, and in certain areas it definitely shows it. A good coat of paint will have it looking brand new...


By day's end yesterday I had put two coats of primer on the top to even out the colors...

Will and I are heading to Home Depot as soon as I hit "publish" on this post and I'll bring home a gallon of fresh, crisp, white paint. Once the painting is done I'm going to give it a surprise pop of color to help further tie the two pieces of furniture together, and reinforce the girly-girl feeling of Ellison's room.
Don't tell Will, but I had my own secret doubts about this project. I so badly wanted it to work, but I wasn't certain that it would. The last thing I wanted to happen was to end the project with a massive piece of furniture that clearly looked like a crazy idea gone bad.
But I have to say...I think it's going to work!
Even with just the primer on we can already see what it's going to look like in the end.
I'll keep you updated on the progress.
And keep your fingers crossed for me that,
in the end, it all turns out just like I hoped!
Whew...it's been a while since I've posted.
Between bringing home a new puppy and then getting sick, blogging has fallen to the wayside. I have definitely missed it.
But, good news...things are back to normal now and I have several projects in the works!
First, look what we got...

We've been searching Craigslist daily (hourly) for hardwood flooring for our family room. So far...no luck. Our budget is small. Really small. So, we're just waiting (anxiously) to find the right listing.
But while we were searching we stumbled across a listing for just over 50 sq. ft. of pre-finished hardwood flooring for less than $1.00 per square foot.
It was too good to pass up!
And (bonus) the person selling it lived really close to us, so we drove over and snatched it up right away...

You're probably thinking "where will you put a measley 50 sq. ft. of flooring?"
Hmmm...

Welcome to our Master Bathroom...

You've never been here before because I have never been willing to show you.
But for the sake of DIY and the always coveted "Before" photos, please take a look at our
lovely carpeted Master Bathroom...

15 year old carpet.
Ughh...

So you can see why we jumped on the chance to buy pre-finished wood flooring for such a great price, right?

Now, ideally, we would be doing a major overhaul on this bathroom and starting from scratch. The bathroom screams 1995 with its mauve, floral tiles, but a remodel isn't in the cards for us right now.
Someday.
But until then we are happy just to get rid of the carpet.
Is hardwood flooring really the best idea in a bathroom with double sinks and a big, garden tub?
No.
But here was our train of thought:
We never use our bathtub. And I mean never. It's turned out to be a big, vacant space that holds our laundry baskets, and those just end up holding our dirty clothes and towels. If we had our way, the bathtub would disappear entirely.
In the future we hope that a big demo and remodel are what we can count on. When that happens, we won't be heart broken over tearing out this new wood flooring because:
1. We're only out $50.
(Pennies in the grand scheme of a remodel)
2. In the mean time, we get to live carpet free in our bathroom!
3. Laying hardwood floors in our bathroom will be great practice for us so that we know exactly what to do (and what not to do) when we finally lay hardwoods in our family room.
The directions on the flooring state that you should let it sit in the room that it will be installed in for two weeks prior to installation so that it can acclimate to the temperature of the room. We're about halfway done which means in about a week, we'll be ripping out carpet!
I cannot wait!
For now, we'll keep checking Craigslist for 280 sq. ft. of Red Oak Pre-finished hardwood flooring.
It has to show up eventually, right?
Until then, I'll just keep reminding myself...
patience is a virtue.
 As you know I am a fan of the northern New England coast. Though the water is always cold and the coast rocky, with few soft sandy areas, I love the contrast of ocean and craggy coast line. This house, redesigned by Whitten Architects is a perfect example. The house began as 1950's ranch, but was renovated into a spectacular ocean front home.
 The owners requested that they keep the feel of old beach house. The screen porch above captures the feeling with the beadboard ceiling and wicker furniture.
 Here is another porch - I love the rockers and granite steps - this is classic coastal Maine.
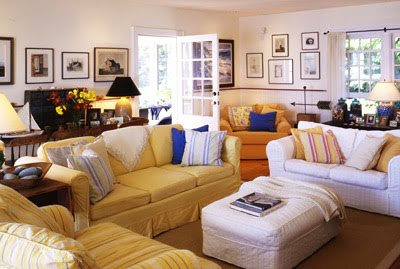
The owners are empty nesters, but wanted the home to have lots of seating and bedrooms for guests. I love the choices of slipcovers in this room. Also notice the sisal rug. They mixed in some antique tables and accessories which give the room wonderful, warm feeling. Notice the antique weathervane arrow and the black and white framed photos lining the walls.
 They were able to find and incorporate an antique mantel in the family room. Doesn't it just make the room?! Again more black and white photos - this is an easy and inexpensive decorating touch that can a classic feeling to your decor. Antique Pond boat on mantel is a classic addition.
 Above is the kitchen, notice the cabinets are mixed with an antique painted cupboard. You can see the loft above from a different angle.
 A four poster bed is the one of the highlights of the master bedroom, but the view is the real highlight. Sheer curtains, frame rather hid the spectacular view.
 Built in beds make the most of the sloping ceilings. A fabulous retreat for the younger set. For more photos of built in beds click here.
'
Check back this week for photos of my finished dining room and another new project ...
'
Check out other renovations at Between Naps on the Porch - Metamorphsis Monday
(all photos Whitten Architects - photo credit Brian Vanden Brink)
Subscribe to:
Posts (Atom)


