Let me start by saying that when it came to storing my gift wrap, my organizational skills were...well, non-existent.
For the past two and a half years that we have lived in this house, I have kept all of my gift wrapping supplies in a corner of our closet in our Master Bedroom.
Why?
The only answer I have is that the day we moved in, that was where it landed.
And that is where it has stayed.
Not only was it an ugly, cluttered mess to look at, but most often, I didn't even know what I had back there. So when it came time to buy a gift for someone's birthday, I would also buy supplies to wrap it...not realizing that I already had everything I needed back in the deep, dark depths of my closet.
But not anymore!
Check this out...

Ahhh...
Makes me happy!
Like many of you, we receive the Lowe's Creative Ideas Magazine that comes in the mail. The one that came in December featured a project that I immediately jumped on...

with an end result that looks like this...

And with project details like this...
 it was a no-brainer.
We already had almost all of the necessary supplies, so the $85 cost estimate came way down.
We started with a sheet of peg board that was doing nothing more than collecting dust out in the garage...
 I think it had probably been sitting out there for about two and a half years (yep - ever since we moved in), but it was left over from back when Will built his workbench and used peg board to hang up some of his tools and gadgets. It was no longer the prettiest or cleanest sheet of peg board, but with a coat of paint it would look good as new.
We did not follow the Lowe's guidelines on size. We had a specific spot in our laundry room where we wanted to hang it, so using all of our available space became the goal. Ours measures roughly twice as big as the one in the Lowe's magazine.
Will added supports to the back to make the peg board more rigid...

Then I gave it a coat of paint and waited for it to dry.
I used one of my favorite colors:
Benjamin Moore - Stratton Blue #HC-142

We bought three cafe rods at Lowe's that were less than $3.00 a piece.
(This turned out to be the only thing we had to buy for the project - everything else was already here.)


Once the peg board was dry, we laid it out on the table to measure out the best positions for the rolls of gift wrap...

We attached the cafe rods with the included hardware...

then hung it up on the wall, screwing through the perimeter frame behind the peg board and into the studs in the wall.
And then it was just a matter of going through all of my gift wrapping "stuff" and organizing it all to fit. We already had a box of hooks, so I pulled out what I needed and got to work...

 Instead of buying cute, wire baskets like they used in the Lowe's version, I opted to use craft bags hung on a hanger to hold all of my cards and tissue paper...
It's not that I wouldn't have liked cute wire baskets, but the goal was to use what we had, not buy more. And as it turns out, the bags work perfectly...


As for gift bags, I saved only the ones that I actually thought I would reuse, and hung them in place. The rest got thrown away.
(I'm not one for saving bags that we get as gifts. I know that many people choose to save all of the bags and tissue that they get when they receive a gift, but I wonder how much of it they actually reuse? The bags that I chose to keep have come from Ellison's birthday's and I think they're pretty darn cute, so the possibility of reusing them is very likely...now that I can find them!)

I had no idea that I had this many balls of ribbon!
They all fit neatly onto small hooks...


A pair of scissors, so that I am never left searching for them...

Plenty of tape...

And three rolls of gift wrap that fit the season and my mood...
snowflakes
polka-dots in cool colors
and craft paper

The cafe rods simply pop out when you need to get the paper down or change out a roll.


I love that it takes up almost no room!
Using vertical storage is a huge space saver...


All I can say is...
it's about darn time we got all of that gift wrap out of our closet!
Not only will it be a breeze to wrap a gift now, but I am one step closer to having an organized closet that I actually enjoy walking into.
So I'm curious...when it comes to gift wrap, how do you keep it all organized?

it's about darn time we got all of that gift wrap out of our closet!
Not only will it be a breeze to wrap a gift now, but I am one step closer to having an organized closet that I actually enjoy walking into.
So I'm curious...when it comes to gift wrap, how do you keep it all organized?
P.S. I am posting this at:
Make Your Monday, Make It For Monday, Just Something I Whipped Up, DIY Day, Toot Your Horn Tuesday, Talented Tuesday, Making Your Home Sing Monday, Get Your Craft On, Trash To Treasure Tuesday, Show And Tell, Works For Me Wednesday, Look What I Made, Transformation Thursday, Thrifty Thursday,
100 Ideas Under $100, Get Your Craft On Thursday, Strut Your Stuff, Make It Yours Day,
Frugalicious Friday, Show And Tell Friday,
100 Ideas Under $100, Get Your Craft On Thursday, Strut Your Stuff, Make It Yours Day,
Frugalicious Friday, Show And Tell Friday,
Food for thought...

Wise words.
...............................................................
Check back tomorrow for your chance to enter our first giveaway of 2010!
You're going to like it!
................................................................
And don't forget...tomorrow AnNicole is hosting her Organization Party over at Our Suburban Cottage...
Be sure to link up if you have a project to share.
I'll be there!
Last week Will and I tackled a small corner of our closet that has always been terribly unorganized. Now, those items have a new home and are far more useful because they are organized in a neat and tidy fashion.
I'll show you tomorrow!
...........................................................
And in a moment of realization...
is anyone else amazed by the fact that tomorrow is February 1st?
Seriously.
Where did January go?
 Earlier in the week I promised you a tour of a wonderful newly constructed house in Utah. Built by a reader of WD and her husband (who previously worked for Christopher Peacock Kitchens). The house is an wonderful example of true craftsmanship.
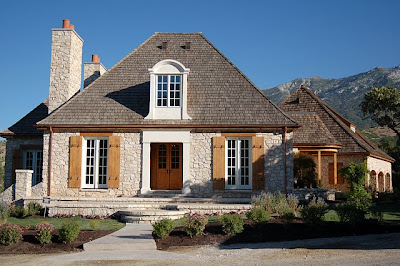 We were able to get a private sneak peak into this home which they refer to as the "French House". The home is currently for sale, and unfurnished.
More often than not designers spend large amounts of time bringing interest and depth to plain rooms. I think it's important to show how wonderful and warm a home can look, even unfurnished, for you to have a true appreciation what good architecture and craftsmanship can bring to a space. Even empty this home is stunning.
 The main entry, though not grand in size is really beautiful. Notice the key details here: herringbone floors, hand forged iron railings, exquisite moulding details and a beamed ceiling. Beyond we see an interesting curved hallway.
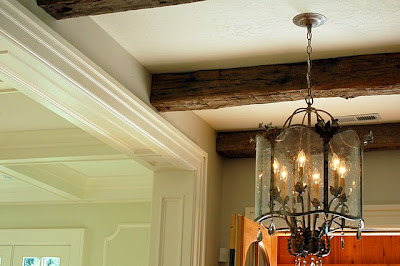 Here is a close up of the reclaimed hand hewn barn beams
 Of course when the builder is also a world class cabinet maker you know the kitchen will be the jewel of the home and this one is gorgeous! It has a very Christopher Peacock feel, but I think this particular kitchen has even more personality. I love the front X detailing on the center island. Also notice the coffered ceiling. I also like the choice of light fixtures!
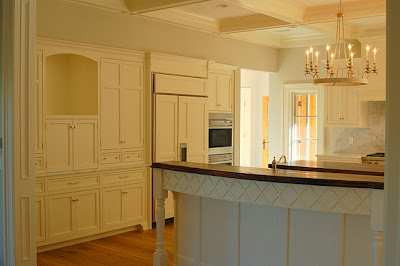 Notice the the first center island has a soft curve to it, which was harder to see in the picture above. Having a conversation at a curved island versus a straight one is much more enjoyable. You should always try to incorporate even a soft curve in a kitchen island if possible.
 I love the subtle diamond shaped marble tile backsplash. As expected the kitchen is outfitted with top of the line appliances.
 The first island has been thoughtfully designed with a step down so guests can't view a messy sink. The second island is topped walnut for food prep.
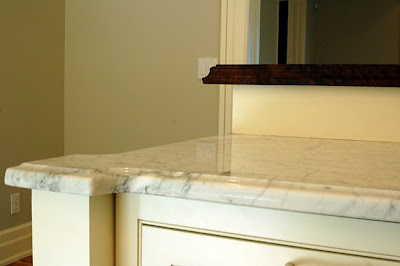 Here is a close up of the corner detailing on the island! Wonderful!
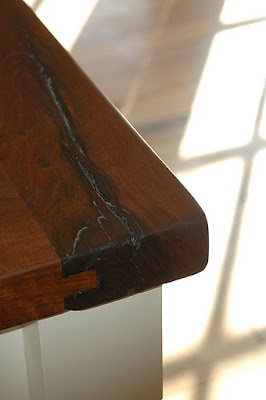 A close up of the walnut top - notice its tongue in groove and bread board sides.
 Coffered ceilings continue in the Living room, which also has a stunning fireplace and surround. Can you imagine how wonderful this home would look furnished?
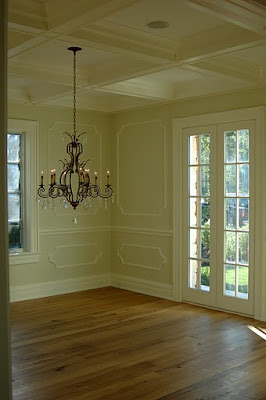 The dining room with French doors and interesting moulding details
 The family room continues the coffered ceilings. I love the fireplace! My imagination is going wild furnishing it in my head!
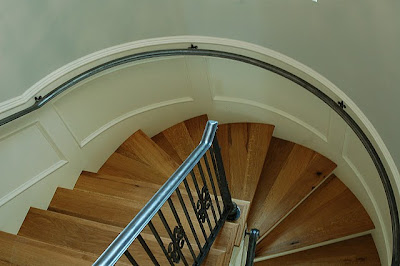 The curved staircase is just stunning - hand forged iron railings are beautiful.
 A quick peek into the master bath which reveals a coveted zinc soaking tub.
 This porch off the Master bedroom is one of several porches to take in the spectacular mountain views.
 Notice that the outdoor detailing and stonework are as elaborate and thoughtful as the indoor detailing. This shows just part of the back of the home. See the mountains on the right.
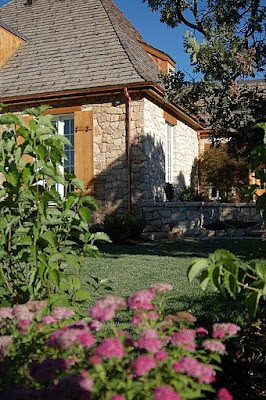
 Here is a side view - a lovely landscaped path - notice the copper gutters and cedar shake roof. More spectacular mountain views.
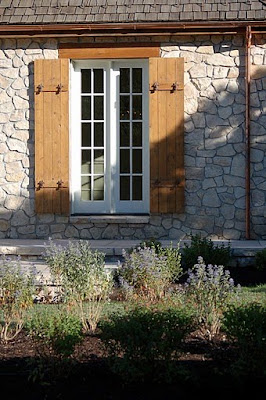 I adore the charm of these shutters!
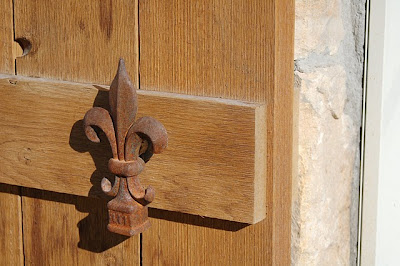 No detail was left out. Look at the close up of these iron fleur de lys.
 Even the garage was not overlooked. I love the heft and depth of the stone outside the garage. Look closely to see the herringbone brick detail in the driveway.
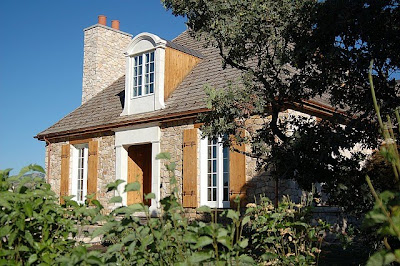 This gorgeous house is a spectacular example of craftsmanship. It was recently on the local "Parade of Homes". For more information on this home and to see
the real estate listing click here.
For more information on the iron work and railings click here.
Subscribe to:
Posts (Atom)