From my home to yours, wishing you all a very happy holiday!!

It has been a great gift to travel this road with you.
Thank you so much for reading, commenting and continuing to inspire me.
Wishing you peace and happiness in the New Year!
xxx-Gina
New Year's Eve is fast approaching,
and whether you're going all out to ring in the New Year with a
big bash
or taking it easy at home in your slippers and comfy pants relaxing by the fireplace,
you may want to add this drink to your menu for the evening...
Cranberry Margaritas

I spotted it in this months issue of Sunset Magazine and, being a cranberry lover myself, I ripped out the page right away and posted it on the fridge letting Will know that we would be making these on Christmas day.
They were delicious and so simple to make!
You can click here for the recipe.
Enjoy!
................................................
I hope you all had a wonderful holiday!
We sure did...
and still are.
We're making the most of Will being home and the kids being out of school.
All we need now to make it complete is a little bit of snow.
(That's wishful thinking at its best, right there! Maybe we'll go find some snow instead of waiting for it to find us!)

Just wanted to wish everyone a very Happy Holiday!
From our home, to yours...
Merry Christmas

Our Christmas is well under way and our kitchen is going to need a much deserved break once all of the festivities are over.
We're spending Christmas Eve with my family and Christmas Day with Will's family. We're hosting at our house for both gatherings and we can't wait to get everyone over here.
We're ready!
We've spent the past several days cleaning, baking and creating gifts.
I think this gift might just be my favorite this year...

I decorated another candle. This one much more rustic and natural than the first.
I used twine wrapped just above my epsom salt line...

Tied with a large rusty snowflake, I think she's going to like it very much!

What do you think?
I think I need to make one for myself!
The house smells delicious...thanks to more Sugared Pecans and Cranberry-Orange Bread. We made Spritz Cookies too, and there's a double batch of Sugar Cookie Dough that is currently in the fridge waiting to become cut-outs of yummy Snowmen and Christmas Trees and Stockings.
Mmmmm...
I'll be back after the holiday!
Merry Christmas!
P.S. Our Christmas Cards were created by a client and friend of mine. She's a wonderful photographer. If you're local, check her out!
Click here for her website.
Click here for her blog.

I wanted to share with you the evolution of my living room.
(click on any photo to enlarge)

My living room is a warm and inviting room with windows on two sides and sun coming from a third side through the Conservatory. I have always been hesitant to cover the windows with any window treatments - as I hate to block any light. But, clearly my living room needed some softening. Above is the before.

After a long search for perfect Belgian linen and a tutorial from Joni at Cote De Texas on curtains (do click this link - it is a fabulous resource) the day came to have the drapes installed. I hired a professional drapery installer. I am a good at many things, but this area is best left to a professional.

Here is the after (please disregard the wreaths in the windows as they are part of my holiday decor.) The curtains are Parisian pleat tops, double window width with a trouser break bottom. The rods are hand forged iron and sent up from New Orleans by my dear designer friend, Millie. You can see the richness and softness the new window treatments bring to the room.

Here is the living room from another angle. You can see my cherished Mora clock to the right. For the story on how I acquired that clock click here. Notice the sweet Gustavian chair in the bottom right of the photo.

Here are the Gustavian chairs from another angle. The painting is a lovely work by Cape Cod artist, Anne Packard. We usually put our Christmas Tree here.

This angle is taken by standing at the Mora clock. Also notice my new "soft" seagrass rug- which really is very soft with white cowhide rug overlay - to learn more about cowhide rugs click here.

I added a few more holiday decorations in this shot. Notice the garden urns by the fireplace filled with berries, branches and evergreens.

I added more oversized mercury glass ornaments to compliment the ones on the mantel and also to pick up the sparkle from the mirrored trees in the Conservatory. I also love the texture and smell of the Rosemary Topiary trees.
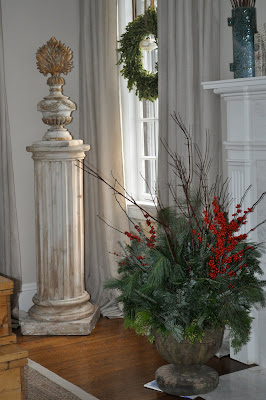
Finally here is a close up of a reliquary and pedestal, as well as a close up of the garden urn. I love the warm colors and the way that the evergreens and mercury glass add a holiday sparkle to my room. Let me know your thoughts, should I add more holiday decorations or leave it as is?
(all photos property of Willow Decor)

I must say, I think they turned out great!
Here is what I did to dress them up.
Last night I went to sleep having finished the process of gluing on the Epsom Salt with the Mod Podge...

I let them sit on the drying rack overnight, so that the mod podge would (hopefully) be good and cured by this morning when I needed to get them fancied up and wrapped for the boys to give to their teachers.
I used some red, satin ribbon...

steel wire...

and ball point pins...

I wrapped the ribbon around the candle lining it up just past where the epsom salt ended. I wrapped the ribbon as tightly as I could, while trying to cause the least amount of disruption to the salt (this was easier said than done). I folded over the ribbon on the end that would overlap and secured it with two matching red pins stuck directly into the candle...


I then took my wire, making sure that I had enough of it to wrap around the candle several times, and twisted it in the back to keep the wire tight...
 I punched a hole in a small card that I attached to the candle, running the wire through the hole...
The greeting I wrote in their teacher's cards:
Hoping your Holiday is
Merry & Bright!

I am really happy with how they look!
The satin ribbon makes the candle feel fun and festive for Christmas, and the wire adds just a bit more shine to the already sparkly candles.


Of course, once Christmas is over, they can take off the wire and ribbon if they choose and they will be left with an elegant, simple candle that they can enjoy all year long.

I found the perfect gift bags for our 9 inch candles in the...
wine department
at the grocery store!
Seriously.
Wine bags were the only bags tall enough.
And once I saw these bags, I knew the boys would love them, which would make it even more fun for them to present to their teachers...

I'm going to dress up the other 4 candles that I made last night to give as gifts as well, but I want to change up the look a bit.
Maybe a bit more rustic and subdued.
Here's hoping the next four work out as smoothly as the first two!
P.S. I am posting this at:
The Inspired Room for Holiday Linky Friday
The Shabby Nest for Frugal Friday
Maybe a bit more rustic and subdued.
Here's hoping the next four work out as smoothly as the first two!
P.S. I am posting this at:
The Inspired Room for Holiday Linky Friday
The Shabby Nest for Frugal Friday
The directions:
(and I quote)
"Spread some Mod Podge on each candle with a sponge brush, then roll the candle in Epsom Salt in a ratty old pan."
That's it!
Easy, right?
It must be! She said her 5 year old helped make them.
But I wasn't about to go there.
My six year old would be covered in mod podge and the kitchen would be covered in salt.
But if her 5 year old can do it, then clearly, I should be able to.
I saved the idea to my Tumblr as soon as I saw it.
I needed a gift to give the boys' teacher's for Christmas, and this fit the bill perfectly!
I went to Michael's and bought my supplies.
9 inch candles on sale, no...on SUPER sale, for $1.99!
My plan to do two candles increased in that very moment and I came out with six.
(I mean, seriously, $1.99...I know at least four more women that would be happy to receive a pretty candle...myself included!)
I found the mod podge (I'm still not sure exactly what it is, or what it's really used for) and was on my way back home.
As soon as our little girl was sound asleep for the night, I started in on the project. Just to be safe, I re-read the directions that she had written (...and came away totally unsatisfied with the lack of step-by-step instruction...because how could something so pretty be that easy?). I'll admit, I thought for sure I was going to screw it up somehow. But that probably came from the fact that I need the boys to take these to school with them tomorrow morning to give to their teacher's (it's the last day before Winter Break) and I did not have a back up plan if these didn't work.
Luckily...they worked out perfectly!
So this is me, telling you...
you can count on this to work!
All you need is:
any candle of your choice.
Any size, color, scented or unscented...it's up to you.
I went with white to be certain that it could fit in with any decor...

Instead of running the shimmer all the way to the top of the candles, I wanted to stop about 3/4 of the way up. I put a rubber band around each candle before I started so that I would have a decently straight line to go off of when I was painting on the mod podge...

I lined everything up - assembly line fashion...
candles
mod podge and brush
epsom salt
and a drying rack covered in waxed paper to catch any excess glue and salt

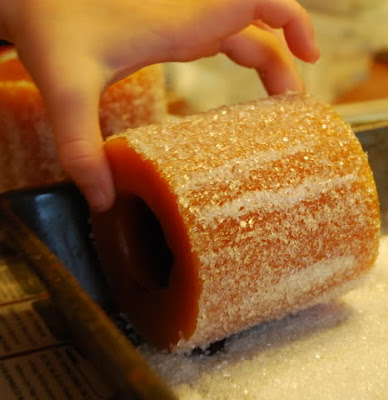
I put the epsom salt in an old baking pan and filled it to about an inch deep. I didn't want to run the risk of the candle rolling on the bottom of the pan and scraping off the salt. I'm sure it was unnecessary, but it made me feel better...

Candle #1...
success!

Pretty, right?
After I rolled the candle in the salt and stood it up on the drying rack, I immediately and carefully rolled the rubber band up off of the candle. I was afraid to leave the rubber band on just in case any mod podge had gotten under it. I didn't want to end up with the rubber band glued to the candle.
Not exactly the look I'm going for!

Four down, two to go...

I ended up buying two different bottles of mod podge. Again, since I had never used it before, I didn't know what to expect. The first was just plain, glossy finish. The second was called "sparkle". It was worth trying. So the last two candles were done in the sparkle mod podge. You can see in this next photo that is has a very fine glitter in it...

Honestly, looking at all six finished candles, I can't tell the difference between the glossy candles and the sparkle candles...

All I know is that I am really, really happy with how they turned out!
I'm going to let them fully dry overnight and then embellish them and wrap them up for the boys to take to their teacher's in the morning...

Thank you, thank you to Emily at Remodeling This Life!
Your daughter is right...
"you have some interesting ideas."
And thank goodness for that!

I'll show you all the finished product in the morning...
P.S. I am posting this at:
The Inspired Room for Holiday Linky Friday
The Shabby Nest for Frugal Friday
P.S. I am posting this at:
The Inspired Room for Holiday Linky Friday
The Shabby Nest for Frugal Friday
...for me, anyway!
Check it out...

Can you tell what it is?
Old windows.
Lots and lots of old, beautiful windows!
My sister-in-law, Becky, and her husband, Ryan, live in Portland, OR in a neighborhood that was built in the very early 1900's. A couple of months ago, while on a bike ride they noticed a huge stack of old windows sitting on the lawn in front of a house in their neighborhood. The woman who lived in the house was replacing all of her home's original windows with brand new one's.
Becky asked the woman what she was planning on doing with them and the woman said, basically, "if you want them, take them" - she just really wanted them gone and off her lawn. Becky gave Ryan the look (knowing full well that you don't run across this kind of jack-pot every day!), so Ryan rode home, got in the truck and went back to load em' up!
They know my affinity for old windows and were confident that between Will and I, we would be able to make something great with them.
They were planning on saving them for me for Christmas, but circumstances made it easier for them to get the windows up here now. They're currently sitting in our garage, waiting to be used.
I'm thinking the playhouse could use another window, for sure.
And after that, the sky is the limit!
Time to get creative.
Thanks, Becky and Ryan!
I am giddy!
Subscribe to:
Posts (Atom)