I have had a lot of questions about how I painted the scallops in Ellison's bedroom, so I decided to do a tutorial.

Two things you should know first:
1. I do not at all claim that this is the easiest way of going about painting scallops!
This is just my way!
If any of you have an easier, more efficient system, by all means...share your knowledge!
2. I apologize in advance for the pictures of my process. They were taken at night under terrible lighting, but this is all I've got!
The reason they were taken at night is because that is when I do my painting. Yep - that's my secret! With three small kids running around, it is pretty much impossible to get any kind of painting done during the day, so once everyone is tucked soundly in their beds, that's when my paint brushes come out!
In the case of Ellison's bedroom, I had her in her pack-n-play in my bedroom so that I could get her room done!
Whatever works, right?
Now that my disclaimer is out of the way, onto the how-to...
 You will need:
a level (a long one),
a pencil (or something to mark on your walls),
a saucer (or a round object that fits the size that you want your scallops to be),
and painters tape

First, I used the painter's tape to create a center line on the saucer. The top edge of the tape divides the saucer exactly in half. This is important because...
 ...the points where the tape wraps around the back are the marks that you will use to line up your scallops. If you haven't created perfect half-circles your scallops will look "off".
(Take note: this is where the bad pictures begin. Click on the image and it will enlarge...hopefully you will be able to see the details better)
The first thing I did in her room was pick the height I wanted the scallops to sit at. I wanted them to be above the tallest point on her crib, so that was the determining factor for me.
I painted my top and bottom colors up to a centralized line.
Once the paint was dry, I took my 4' level and marked the line all the way around the room.
I then took my saucer, which had already been taped off, put it against the wall with the bottom of the plate facing me, and where the tape folded over the edge is where I lined up the plate with the level line.
Sheesh. I hope that makes sense...
I then used my pencil to lightly trace the bottom of the saucer onto the wall.
You can see it here:
 ...and here...
 Once I had traced my saucer all the way around the room, I grabbed my paintbrush and filled them in with the pink...
And then...did it again.
It needed two coats...
 It was A LOT of work, but when it comes to kids rooms, I'm more of a "Go big, or go home!" kind of person, so doing this was completely worth it to me!
Once they were done I felt like they were good, but....missing something.
So each scallop got a polka-dot above each point...

I did the polka-dots by using one of these...
 ...in the absolute smallest size I could find. I wanted the dots to be dainty and petite.
A little helpful tip about these pouncers:
Swirl. Don't dab! And make sure that you swirl a complete circle.
Trust me on this one!
It will save you the frustration and agony of having to wipe fresh dots off your walls for re-do's!
 I love how the scallops and polka-dots turned out!
So much, in fact, that many months later I decided to add more...
 I needed something to draw your eyes up when you walked into the room...
 I love polka-dots. She loves polka-dots!
It was a natural choice!
I did these dots using a sponge pouncer (or whatever they are really called) as well, but in a much larger diameter. And the same goes for these...make sure to do a full swirl! That's the secret to achieving a perfect circle!

And that's it!
If I left something out, let me know! I would be happy to answer any questions!
Oh - and if anyone goes for it (a couple of you have already told me you're ready to do it right now), come back and let me know! I would love to see your pictures!
Good luck and happy painting!

P.S. The colors in her room are by Behr.
The pink is called Primrose Bouquet #PPL-43
The green is called Palm Breeze #420E-2
Yesterday Will took the kids to one of our local beaches.
I would have loved to have gone with them, but I stayed at home because I wasn't feeling very well.
I think it's great that he took them to the beach for some special time with Daddy!
He sent me a few pictures while they were playing...
 Owen and Ellison
 William
 Ellison digging for clams
 Searching for buried treasure!
And a super cute message just for me...

The weather here has been amazing!
And on days like these, there are very few things that are better than a quick 5 minute drive to the beach for an afternoon of splashing in the waves and running in the sand!
Here's to a summer full of beach days!
Well then, you are in luck!
Will 420 kids rooms be enough?
That should take a while to browse through, right?
Kelly over at Kelly's Korner hosts a weekly Blog Party called...
 And this past Friday was all about Baby Nurseries and Kids Rooms!
I thought I was joining the party a little late by adding Ellison's Room at #70, but clearly, this is a party that just keeps going and going and going...

So if you're looking for one-stop-shopping for ideas for kids rooms, Kelly's Korner just might be the place for you!
Have fun browsing!
Next week, she's onto Home Offices, so get yours ready and be sure to join in on the fun!
Have fun browsing!
Next week, she's onto Home Offices, so get yours ready and be sure to join in on the fun!
...for picnics, that is!

While I'm all for laying out a blanket on the lawn, gathering together with the kiddos and eating big slices of watermelon, sandwiches, chips and drinking Capri Suns, my husband is...well, not so much for it.
He is much more fond of actually sitting at a table to dine!
Go figure.
I've been asking my resident carpenter for several months now to build us a new picnic table. Just a simple one - planks of wood for the top and crossed legs for the base and the benches.
He's resisting.
So I went searching for inspiration last night to convince him, and I stumbled upon this table from Wayne Of The Woods...
 Perfect!
It is exactly what I want!
And the best part - the building plans for it are FREE!
(This is a very big deal because my husband's one complaint is that I almost never have plans for what I want him to build. Ok, "almost never" is giving myself entirely too much credit. 99.9% of the time, I give him a picture from a magazine or a drawing that I've made with rough measurements. I leave all of the "planning" to him! He's not so fond of that...)
So, the way I see it, it's a win-win for everyone!
I get the table I want and he gets to build it with plans that someone else has already made!
Here are a few pictures that I am going to use to convince him:
This first one being my favorite...


To dress it up a bit, all you need is some fabric to drape over the sides...

So pretty!
I LOVE the casual, relaxed feel of this style of picnic table.
It seems to carry with it a sense of age and history.
It's rustic and charming and can take on the exact look you're going for by washing it with a coat or two of stain or paint. Or simply, let it age naturally.
It screams low maintenance, which I will admit, is undeniably appealing!
And just in case I wasn't convinced enough that this was the style of table that I wanted for our backyard...
Just as I was about to load up the kids and head to the grocery store this morning, I got a phone call from my mother-in-law. She said she had two magazines for me that she was going to leave on the table on my front porch - Country Living and Coastal Living.
Awesome! My favorite!
I couldn't help but laugh when I saw the cover of the June issue of Coastal Living...

As far as I'm concerned, it's a sign!
Meant to be!
Somehow I doubt my carpenter will see it that way...
But I will certainly keep trying!
photos courtesy of CountryLiving.com, PotteryBarn.com and CoastalLiving.com
 My new breakfast room is almost finished. After searching for several months I found a wonderful nine foot long antique Belgian Table with an incredible iron base.
  The iron work is so interesting that I didn't want to hide the front of it with traditional chairs.
(I know the photo leaves a lot to be desired - taken on my cell phone)
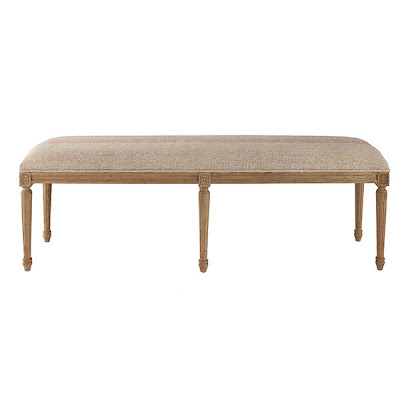
So imagine my surprise when I saw this great bench at Wisteria and it was covered in a vintage grain sack like linen! The perfect size too!! So I ordered it!
It just arrived this morning and its perfect!!

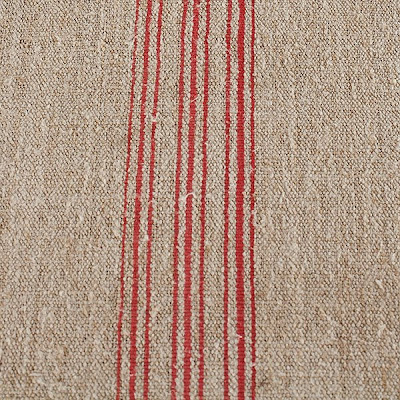 I chose the red stripe versus the blue; but I really like them both!
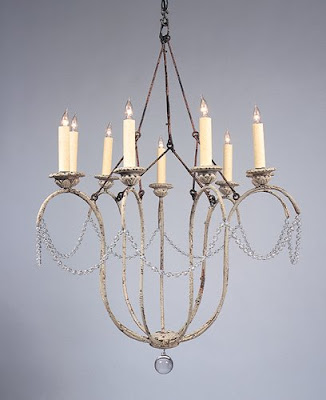
Still waiting for my chandelier (Niermann Weeks) before the big reveal!
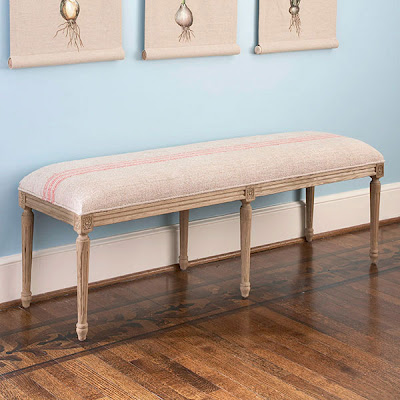
But wanted to share what I think is a wonderful find at a great price!
(and did I tell you I also had a 20% off coupon?)
It has finally come together!
And just in time for the long Memorial Weekend...
And just in time for the long Memorial Weekend...

The kids love it even more than I could have hoped for...
which is nice considering all of the time and effort that went into designing, building, painting and decorating it!
Remember where we started from?
Here are a few of the exterior elements:
A starfish...of course...

A hanging lantern...

A cedar flower box made to fit perfectly by Daddy...
(the boys picked out the flowers - they were going for the colors of the rainbow!)

And...
(drumroll, please...)
A Dutch Door!!
If I can't have an adult sized one, then at least we can let the kids have one!

Having my own Dutch Door (or two, or three) is still definitely on my wish list though!
We are extremely happy with how it turned out!
The shingles on the facade made all the difference on the look of the house, so despite it being a challenge to put them up (because we were working on such a small scale), we're both happy that we took the time to do it...

And my old window fits in perfectly with the look I was going for...

It is only 4 feet by 4 feet on the inside, but surprisingly, we can all fit in it...
at the same time!
And several of the women in our family can actually stand up straight while inside the house!

The kids got to see their cousin, Major, this weekend and I was thrilled that he (at nearly 2 years old) was just as happy to chill inside the playhouse as our kids are!
It was pretty cute to see all of them in there together!

And I can finally display the House Numbers that I made for the playhouse...
(see the rock at the corner?)
I still need to make a "playhouse" sign for the outside and I would love to find a nautical themed weather vane to put on the roof, a little manual doorbell would be adorable...
but other than that, the exterior is finished!
I will show you pictures of the inside once we have it finished. We're still debating over a couple of options - just deciding which route to go. But I was able to get all of the interior painting done - which was no small task!
Have you ever tried to paint OSB?
Not fun at all!
And unlike the lucky ladies that can stand up on the inside, I (at 5' 9") cannot, so painting was....painful. But I love how it turned out and look forward to getting it finished up!
I can happily say...
chicken coop-turned-playhouse has been a great success!
................................................................
I am adding this post to the line up over at Julia's weekly blog party - Hooked on Friday's! Be sure to head over and see what everyone else is Hooked On this week!
And if you're feeling inspired, share what you are Hooked On too!
Subscribe to:
Posts (Atom)